Developing Luanti for Android #
The instructions in this article were written for and tested on Linux, but the tools used here should also work on other platforms.
Prerequisites #
- Basic familiarity with the command line.
- You have a working network connection.
- You have already downloaded / cloned a copy of Luanti to a folder called
luanti. - You have an Android device you want to install Luanti on for testing purposes or you want to produce a Luanti release build for distribution.
CLI tools #
Setup #
You should have a recent version of OpenJDK installed (17 should be enough).
Download the command line tools from the corresponding section on the Android Studio downloads page.
Then extract it into an empty folder with the structure being as seen below.
The android-sdk folder will then become your SDK folder.
- android-sdk/
    - cmdline-tools/
Then open a terminal in android-sdk/ and run the following command to accept the licenses for the SDK.
Accept the licenses that you definitively should read carefully.
./cmdline-tools/bin/sdkmanager --licenses --sdk_root=.
Now create a file called local.properties and configure the path to the Android SDK there:
cd luanti/android
echo 'sdk.dir=/home/<YOUR USER>/android-sdk' >local.properties
Building #
Optional: First figure out the ABI of the device you wish to build for and disable all other ABIs to significantly reduce build times. (See here for details.)
Luanti uses a Gradle Wrapper, which makes building Luanti for Android very easy: You just run
cd luanti/android
./gradlew app:assembleDebug
This will produce a number of debug builds in the form of .apk files (depending on the enabled ABIs)
in android/app/build/outputs:
$ find -name '*.apk'
./app/build/outputs/apk/debug/app-armeabi-v7a-debug.apk
./app/build/outputs/apk/debug/app-x86_64-debug.apk
./app/build/outputs/apk/debug/app-x86-debug.apk
./app/build/outputs/apk/debug/app-arm64-v8a-debug.apk
If you want to build a release, you would invoke ./gradlew app:assembleRelease instead.
To sign the release APK before distribution, you should use apksigner.
(Debug APKs will already be signed automatically with a debug key.)
Installing #
If instead of building APKs you want to directly build and install the appropriate APK on your phone via the
Android Debug Bridge (ADB) 1, you can run ./gradlew app:installDebug,
or ./gradlew app:installRelease if you want to install a release build
(e.g. for performance testing) instead.
Using Android Studio #
First, install Android Studio,
for example by downloading an official release, unpacking it and then running ./android-studio/bin/studio.sh.
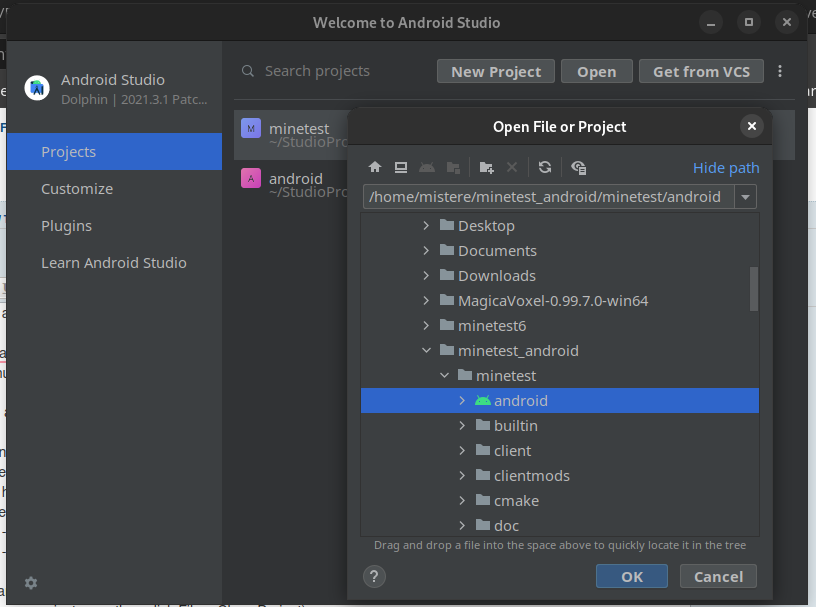
Then, open luanti/android (not the luanti folder):

It will load for a while. Be patient.
If you just want to quickly install and run a debug build on your phone, you can simply click the “run” button in the top bar, which will build Luanti for the correct ABI and install it afterwards via ADB 1:

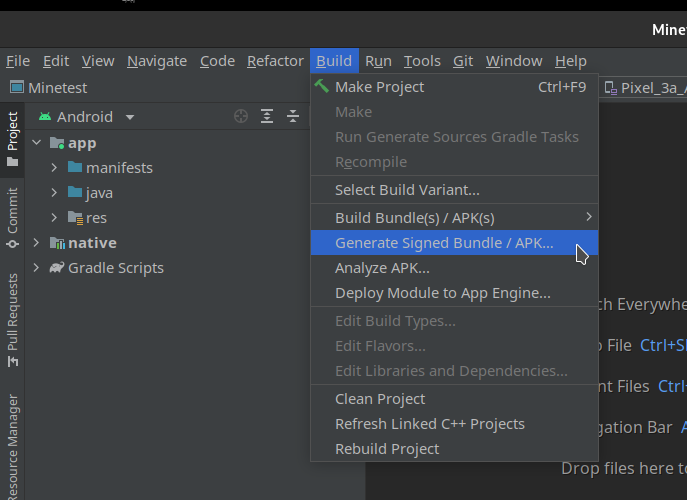
Otherwise, click “Build” > “Generate Signed Bundle / APK” 2:

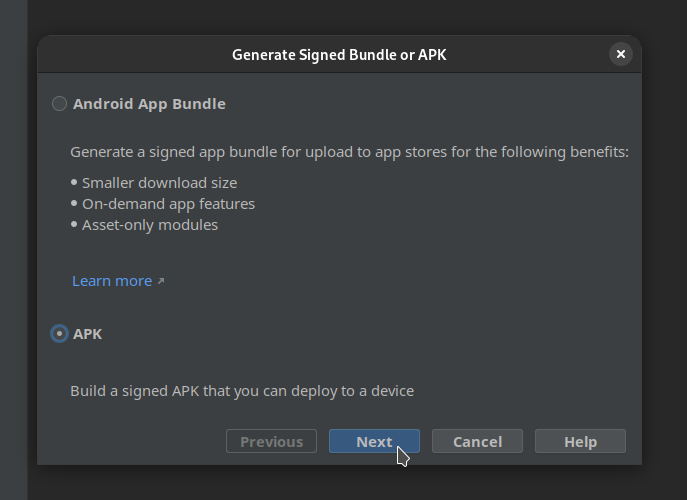
Android Studio will now ask you to choose between a Bundle (for uploading to app stores) and an APK (for direct distribution & deployment). We want to create an APK:

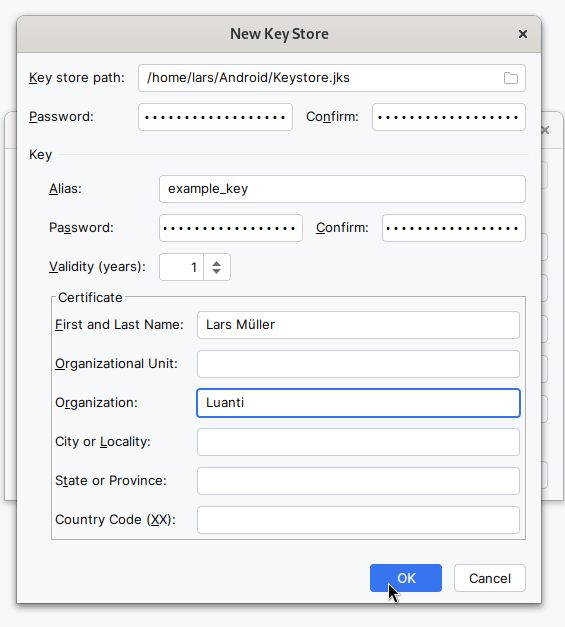
Now we have to sign it. Android Studio guides you through this process. You first have to create a key store if you don’t already have one.
Choose a key store path (you should probably keep this in a safe location), then choose and confirm a key store password.
You also have to choose and confirm an (ideally separate) password for the individual key
(called example_key here).
Key creation asks for personal information. Fill it out responsibly with as much information as you are comfortable providing. You can not leave it entirely blank.

Now proceed: Click “OK” and then “Next”.
Android Studio will ask you to choose between a “debug” and a “release” build. Since you’re already going through the hassle of signing, we assume you want a release build.
Finally, you can just click “Create” and patiently wait for the release build to finish. This can take a while.
Once it has finished, Android Studio then lets you “locate” the APK,
which should be in build/outputs/apk/release
(or build/outputs/apk/debug for a debug build) relative to luanti/android.
If the build fails, you may try “Build” > “Clean Build” > “Clean Project” followed by “Build” > “Rebuild Project”.
This assumes your phone is connected and has USB debugging enabled (or you have set up an Android emulator). For details see the ADB and Android Studio documentation. ↩︎ ↩︎
If you can’t find the “Build” option in the top bar, you have to first click the hamburger in the top left corner. Such is the downfall of modern UI design. ↩︎